Orlando Web Design & Development
1. Styling Links
Links must be style with the “LOVE HATE RULE”
- a:link is used to indicate that the link has been unvisited.
- a:visited is used to indicate that the link has been visited.
- a:hover indicates that a cursor is pointing at the link
- a:active pseudo-class indicates that the links are active.
Example:
 a:link {color: #FF0000}
 a:visited {color: #00FF00}
 a:hover {color: #FF00FF}
 a:active {color: #0000FF}
Common styles:
- text-decoration: none or underline
- color: red
- background-color: red
2. Adding Google Fonts
a. Go to https://fonts.google.com/
b. Search and find a font you like
c. Once you find a font, click on the top right “+” to select the font
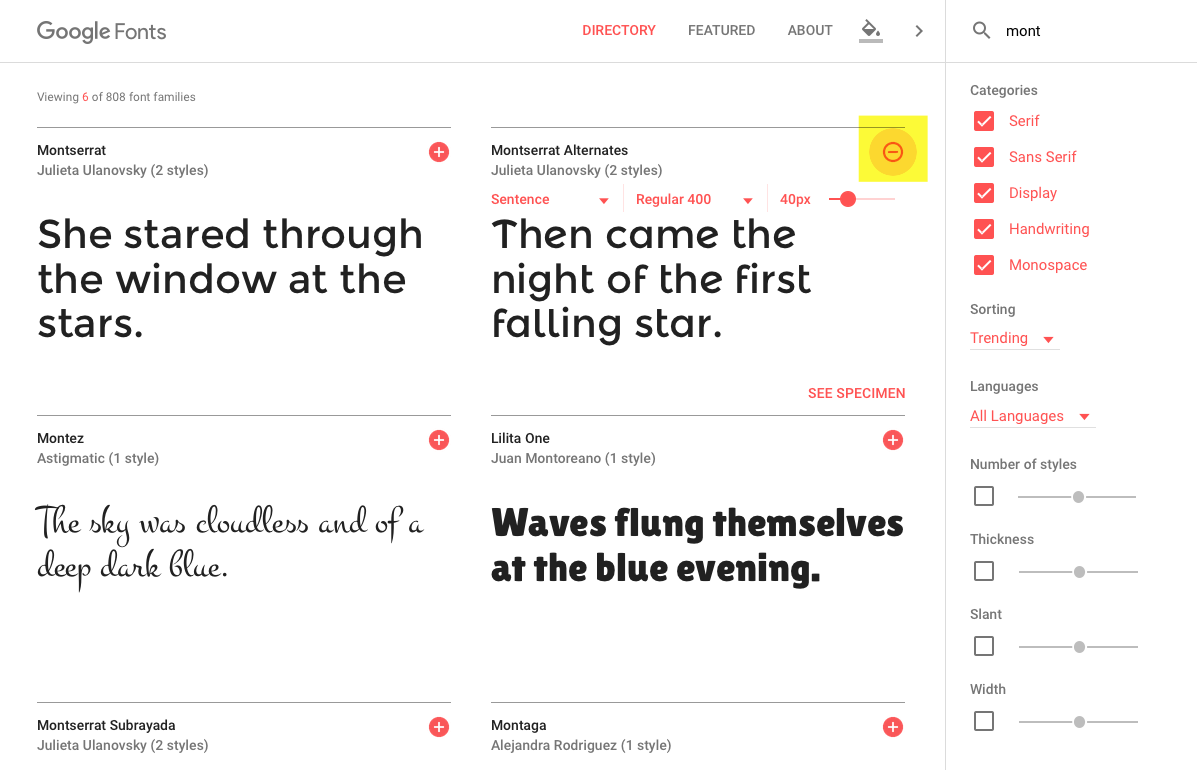
d. After the font is selected, click on the black bar with the title “family selected”, at the bottom of the page.

e. To embed the font into your web page, copy the code and add it in-between the <head> tags

<html>
  <head>
<link href="https://fonts.googleapis.com/css?family=Montserrat+Alternates" rel="stylesheet">
</head>
f. Add the font name to your CSS styles

h1{font-family: 'Montserrat Alternates', sans-serif;, Arial, serif; font-weight: 400; }
g. Preview the webpage in the browser to see the Google font
3. The box model
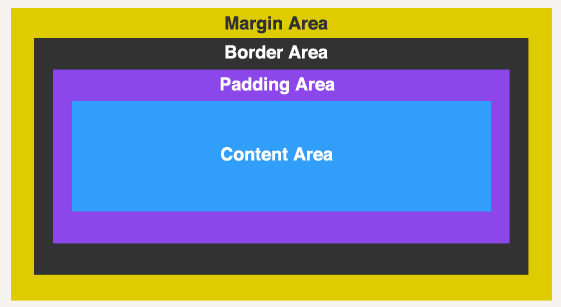
In CSS, the term “box model” is used when talking about design and layout:
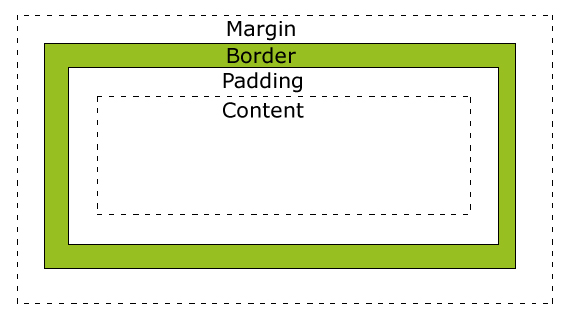
- Margin – Clears an area around the border. The margin does not have a background color, it is completely transparent
- Border – A border that goes around the padding and content. The border is affected by the background color of the box
- Padding – Clears an area around the content. The padding is affected by the background color of the box
- Content – The content of the box, where text and images appear
Width and Height:
To know the full size of the element, you must also add the padding, border and margin.
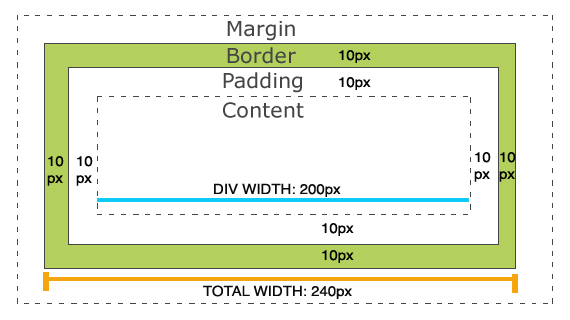
Total element width = width + left padding + right padding + left border + right border + left margin + right margin
Total element height = height + top padding + bottom padding + top border + bottom border + top margin + bottom margin
4. Inspecting with Browser Tools
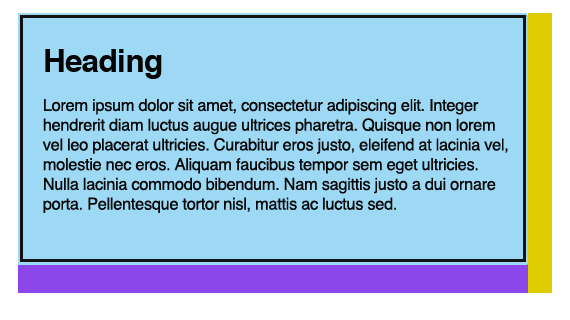
Most browsers offer web development tools where you can edit, debug, monitor and monitor CSS, HTML, and JavaScript live in any web page.
5. Creating a basic layout with CSS
|
PROPERTY |
POSSIBLE VALUES |
EXAMPLES |
|---|---|---|
|
margin |
Lengths, percentages, and the predefined value auto. | margin-top:100px;
margin-bottom:100px; margin-right:50px; margin-left:50px; |
| Shorthand: declare all the margin properties at once.
margin: Topvalue Leftvalue BottomValue RightValue |
margin: 10px 20px 5px 15px;
margin: 0px auto; |
|
|
padding |
Lengths, percentages, and the predefined value auto. | padding-top:100px; padding -bottom:100px; padding -right:50px; padding -left:50px; |
| Shorthand: declare all the margin properties at once.
padding: Topvalue Leftvalue BottomValue RightValue |
padding: 10px 20px 5px 15px;
padding: 10px 20px; |
a. <body> Tag
body{
margin: 0px;
padding: 0px;
background-color:#cccccc
}
b.<div> tags
The <div> tag defines a division or a section in an HTML document. The <div> tag is used to group block-elements to format them with CSS.
Centering a <div> tag
A <div> tag can be used as a wrapper to contain a webpage. To center a <div> tag use left and right margin “auto”:
#wrapper{
width:960px;
margin: 0 auto;
height: auto;
overflow:hidden
 }
c. Display Property
The display property defines how a certain HTML element should be displayed.
Please note: Elements using the property display “none” will not take up space on the page.
|
PROPERTY |
POSSIBLE VALUES |
EXAMPLES |
|---|---|---|
|
display |
none, block, inline, inline-block | div { display:none; }
div { display:inline; } |
d. Float Property
The float property specifies whether or not a box (an element) should float.
Note: Absolutely positioned elements ignores the float property.
|
PROPERTY |
POSSIBLE VALUES |
EXAMPLES |
|---|---|---|
|
float |
left, right, none | div { float:left; } |
e. Clear Property
The clear property specifies which sides of an element where other floating elements are not allowed.
|
PROPERTY |
POSSIBLE VALUES |
EXAMPLES |
|---|---|---|
|
clear |
left, right, none, both, inherit | div { clear:left; } |
f. Overflow
The overflow property specifies what happens if content overflows an element’s box.
|
PROPERTY |
POSSIBLE VALUES |
EXAMPLES |
|---|---|---|
|
overflow |
visible, hidden, scroll, auto, inherit | div {overflow:scroll;} |
g. Visibility Property
The visibility property specifies whether or not an element is visible.
Please note: Invisible elements take up space on the page.
|
PROPERTY |
POSSIBLE VALUES |
EXAMPLES |
|---|---|---|
|
visibility |
visible, hidden, inherit | div { visibility:hidden; } |
h. Styling a Horizontal Menu
To style a horizontal <ul > menu located in the <nav> tag add the following styles:
nav ul{
margin: 0px;
padding: 0px;
list-style-type: none;
}

nav li{
display: inline;
margin: 0px;
color: white;/*Color of the text*/
font-weight: bold;
font-size:14px;
font-family: Verdana, Helvetica, sans-serif ;
}

nav li a:link{
float: left;
display: block;
text-decoration: none;
margin: 0px;
padding: 15px;/*padding inside each tab*/
border-right: 2px solid white; /* line divider between tabs*/
color: white;/*color of the link*/
background-color: black; /*background of the tabs */
height:20px;
}

nav li a:visited{
color: #eeeeee;
display: block;
border-right: 2px solid white; /* line divider between tabs*/
}

nav li a:hover{
background-color: gray; /*background of tabs for hover state*/
display: block;
border-right: 2px solid white; /* line divider between tabs*/
}

nav li a:active{
color: white;
display: block;
border-right: 2px solid white; /* line divider between tabs*/
}


